C-434 | Heavy Duty Residential

PRIER C-434 provides a year round source of water in areas that are subject to freezing temperatures. The hydrant valve is connected to the supply piping in the heated portion of the structure, eliminating the possibility of freezing. To assure freeze protection, the hydrant will drain even with the hose attached and under pressure without spray back.
The C-434 combines freezeless hydrant features with self-draining, anti-siphon and two backflow check valves. The vacuum breaker/backflow preventer provides protection against cross-connection of the potable water supply, while venting to eliminate any vacuum. Upon closure, valve drains even with closed end hose attached. No special installation tools are required.
Take a look at some of our other products that automatically drain, like the C-534 Commercial Wall Hydrant.
Features
- Double check valve and anti-siphon vacuum breaker
- Drains automatically with hose attached
- Integral cast flange with built-in drainage pitch
- Solid brass body
- Satin nickel plated body maintains attractive finish
- Soft-grip coated cast aluminum handle
- Metal collar covers drainage holes and protects against insect nesting while closing under pressure
- Cycle tested to simulate 5000 turns
- Patent protected
- Each valve air-tested at factory for leak-free quality
Product Support
PRIER has been manufacturing the C-434 Freezeless Hydrant since 1992. It is a simple operating product that is fairly simple to repair. The C-434 Freezeless Hydrant drains with the hose attached and under pressure. To accomplish this, there is a bypass assembly in the hydrant. Possible Repair Issues for the C-434 Freezeless Wall Hydrant include:
1. When the water is running, water leaks out from behind the handle
When the C-434/534 Hydrant is turned into the "off" position, the water in the valve will drain out behind the packing nut. If water leaks from behind the packing nut during operation, the o-ring or u-cup bypass has been damaged and needs to be replaced.
To determine which of the two styles you have, the stem needs to be removed from the valve to identify the bypass type. The bypass will be on the stem, near the handle end.
Current Style-O-Ring

Old Style-U-Cup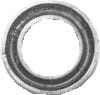
2. The hydrant drips after shut off
A freezeless wall hydrant shuts off inside the heated portion of the structure therefore, the water inside the hydrant will drain out after shutoff. The shutoff point could be any distance from 4" to 24" inside the structure. This installation should also be pitched to allow the water to easily drain out of the hydrant. The hydrant may drip for up to 60 seconds after shutoff. If the water continues to drip after that time, you most likely need to replace the stopper and pin on the stem.
C-434KT-902 Stopper and Pin Kit (with tool and o-ring)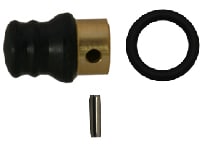
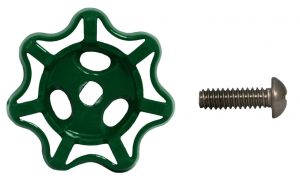
3. The handle is missing from my hydrant
For any one of numerous reasons, your handle may be missing. PRIER's Mansfield Style handle is unique to the Mansfield Style products. This style handle mates perfectly with our stem-end for a snug fit and years of reliable operation.
The required kit is part number 630-7965.
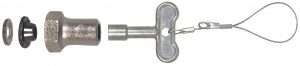
4. How do I convert the hydrant to loose key?
The PRIER C-434 Freezeless Hydrant can be converted after installation from handle operated to loose ket. This design allows for operation only with the provided operating key. It prevents operation of the freezeless fydrant by vice grips or needle nose pliers.
C-434KT-804 Loose Key Conversion Kit
5. The stem end is damaged and I cannot operate the freezeless hydrant
1. Overall length (OAL) of the stem, from tip to brass tip. Do not include the rubber bibb washer in this measurement.

2. Using the acquired dimensions, determine which stem is required from the chart below:
The following stems are for the C-434/C-534 Freezeless Hydrant (manufactured 2007-present):
The following stems are for the C-434/C-534 Freezeless Hydrant (manufactured pre-2007):
6. Water is leaking from the holes by the hose thread
The rubber washer inside the vacuum breaker has failed and needs to be replaced. This is accomplished by unthreading the vacuum breaker from the body of the hydrant and replacing the internals. The vacuum breaker is sealed to the body with a body sealant and may require heat to break loose.
The parts required for this is a C-434KT-906 Vacuum Breaker Replacement Kit
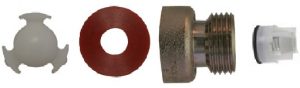
Installation Instructions:
To repair the vacuum breaker on any of the above items, it first needs to be removed from the valve. The vacuum breaker is sealed to the valve and needs to be heated with a torch to be removed. Once it is removed you can reinstall the new parts in the order as shown above.
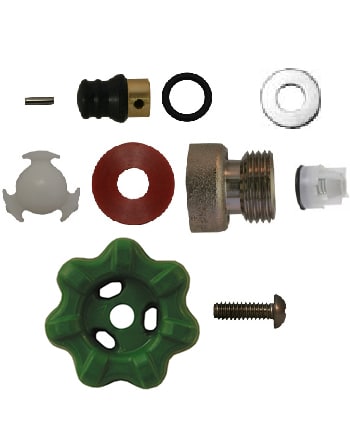
7. I need a complete rebuild kit
Contents of this kit are as follows: